Wednesday, 3 November 2010
POP Art?
Get it? POP art? Because it's POPCORN? muahahaha, I know, bad pun...a bit...CORNY?! LOL!!!
Everyone knows that you can't go to the movies without getting popcorn, I'm pretty sure it's one of the 10 commandments - Thou shalt not watch movies empty-handed. Maybe it's number 11? Anyway, I love the stuff, and honestly, some of my favorite memories as a kid involve helping my dad make popcorn (not the microwave kind - the yummy pan-popped in cooking oil kind) MMMmmm with real butter and just a touch of salt. Amazing. We'd split up the batch, and my mom, dad, sister and I would munch away. Man, my mouth is seriously watering, I haven't had that kind of popcorn in years!!
Anyway, today's nails are inspired by that crunchy, fiber-filled treat that we all know and love, popcorn!
I used Sally Hansen Professional Lavender Cloud for the popcorn bucket/bag/box, then mixed with American Apparel Mount Royal to shade near the top, and Nubar Sexy Red to draw the lines, and for the word POPCORN, which for some reason, is often separated. For the popcorn, I used American Apparel California Trooper, highlighted with American Apparel Cotton, and shaded MAC Brown Bag. Topped it all off with 2 coats of Seche Vite top coat.
Check out this SUPER Yummy Popcorn recipe!! (remember this one from movie night, Yaki?)
Cajun Corn
Yield: 2 1/2 quarts
Ingredients:
2 1/2 quarts popped popcorn
1/4 cup butter, melted
1 teaspoon paprika
1/2 teaspoon onion powder
1/2 teaspoon garlic powder
1/4 teaspoon cayenne pepper
1 teaspoon lemon pepper
Directions:
Pour butter over warm popcorn.
Combine remaining seasonings and sprinkle over popcorn; toss to mix.
How many manis can I do, with only 2 colors and tape??????
So today I did a mani that I LOVED and just had to share with you guys. It's a Funky French, using OPI Sparkle-icious & Sally Hanses Plum Luck. Well I liked the colors together so much, that I wanted to kind of challenge myself and see how many manis I could come up with, using only 2 colors & tape.
To start, here is the mani before the tips were added
This was 1 coat of the Plum Luck, then 1 coat of Sparkle-icious and topped of with SV
Hope you guys enjoyed this, and maybe gave you some ideas for future manis!
To start, here is the mani before the tips were added
This was 1 coat of the Plum Luck, then 1 coat of Sparkle-icious and topped of with SV
Here it is with Plum Luck added to the tips
Now for my challenge. As you can see, I didn't do full manis, but I just wanted to show you all the possibilities! I'm sure there are more, but these are the easiest Tape manis, for me :P
Hope you guys enjoyed this, and maybe gave you some ideas for future manis!
Who says nail art striper polish thingys can't be a full mani...................
Well I say they can. When I saw this Milani nail art brush thingy in Bed Bath & Beyond, I instantly fell in love with the color & knew I had to have it. Now as you can see, RARELY will i do a mani that uses nail art brush polishes. After having it for a few weeks, I finally decided to just use it as though it were just a regular bottle of polish. Now I could have switched brushes to make the application easier, but I didn't, lol. I used the teeny tiny brush that came with it. What do you think? Isn't it such a great color??
This one is called Purple Outline. I even love the bottle it comes in.
This one is called Purple Outline. I even love the bottle it comes in.
Tuesday, 2 November 2010
Wax On, Wax Off
I'm going to start off by saying that Karate Kid is one of the awesomest movies....EVER. How can you not love Ralph Macchio?! And Mr. Miyagi? He cracks me up. SO funny. Paint the fence! Such a great movie, and today's nails were inspired by the handkerchief sewn on the back of Daniel's karate uniform, with the sun and Bonsai tree silhouette.
I used Sally Hansen Professional Lavender Cloud as a base, with American Apparel Manila to make the sun, then darkened it with Zoya Jancyn, then the top part of the gradient is Zoya Jancyn mixed with Nubar Sexy Red. For the Bonsai tree, I used American Apparel Hassid. Topped it all off with 2 coats of Seche Vite top coat.
BANZAI!!!
Patchwork mani Tutorial....
I posted this on MUA back on October 20th, here is the original post
http://www.makeupalley.com/m_116721515
So I figured I should post it here, and hope it helps you guys :) I will only show the 4 nails, that you see in the pic, but you get the idea.
This time I started with a hot pink. Orly Purple Crush
****Please remember to stick the tape to your palm before you place it on your nails. This removes some of the stickiness, and prevents the tape from pulling up your base polish. Sometimes you may need to stick it a few times. ****
Pointer finger
Then go back to your pinky, and using 2 pieces of tape, tape it off

Hope this helps!!!
Oh and if you notice the final step in painting the BFF on my ring finger, I had the tape in the wrong place, but I fixed it, and didn't get a pic.
http://www.makeupalley.com/m_116721515
So I figured I should post it here, and hope it helps you guys :) I will only show the 4 nails, that you see in the pic, but you get the idea.
This time I started with a hot pink. Orly Purple Crush
I then put on a coat of SV, and let that dry.
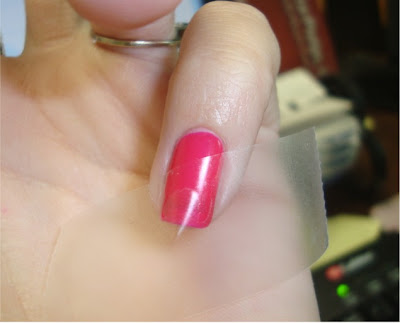
Then I taped off my pinky, like so. ****Please remember to stick the tape to your palm before you place it on your nails. This removes some of the stickiness, and prevents the tape from pulling up your base polish. Sometimes you may need to stick it a few times. ****
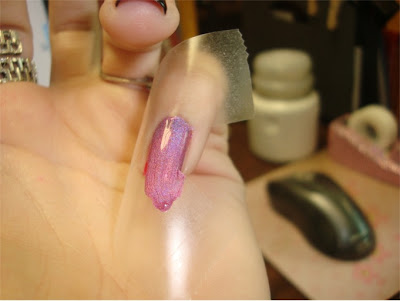
Grabbed my 2nd color, black, and painted the non-taped section
Then pulled off the tape, and ta da
Next was my ring finger. I taped that off (still using the same piece of tape)
Painted the black
and pulled off
Middle finger
Painted it black
(forgot to take a pic when the tape got pulled off :( )
Pointer finger
Painted it black (didn't get a pic again) and pulled it off
Then, when you're done all the nails, top them all off with SV and let it dry
Painted on BFF
Then pulled the tape off

Ring finger
Middle finger
Pointer finger
I didn't get pics of the BFF being painted on the rest, because I figured you had the idea by then. but when your done............you get this!
Hope this helps!!!
Oh and if you notice the final step in painting the BFF on my ring finger, I had the tape in the wrong place, but I fixed it, and didn't get a pic.
Labels:
China Glaze,
Holo,
Nail Art,
Orly,
Patchwork Mani,
Scotch Tape Manis,
Sinful,
Tutorial
A few Claire's swatches
I picked up a few Claires polishes, while out at the Philadelphia Outlets. I am just loving their new glitters!!
These were all 3 coats, and a very easy application!
The first is Dazzling

These were all 3 coats, and a very easy application!
The first is Dazzling
This is Diva
Twinkle Twinkle
Glitter Top Coat
Then of course, I HAD to add black tips to this one!

Labels:
Claire's,
Funky French,
Glitter,
Holo,
Scotch Tape Manis,
Sinful
Monday, 1 November 2010
Dia de los Manicure
So I'm back. Version 2.0. The redesign isn't done yet, but the nail designs are here! :) Like I said before, it won't be every single day (I need a life, too!), but I'll try! :)
Today's manicure was in celebration of Dia de los Muertos, the Mexican celebration also known as the 'Day of the Dead'. Some of the most incredible art is made for this celebration and because of this celebration, and I LOVE this style of art. I based this nail art on an embroidery pattern that I bought from Urban Threads, which is the most amazing site for awesome and nerdy embroidery patterns. The design I used is a skeleton mariachi band! :) Hope you like it as much as I do!
I used American Apparel Cotton as a base, with American Apparel Hassid to outline the skulls, and American Apparel California Trooper to shade. For the background colors, I used Zoya Jancyn on the index finger, Zoya Robyn for the middle finger, and Nubar Sexy Red for the ring finger. For the pinky and thumb, I used American Apparel Hassid for the background, with Nubar Sexy Red for the roses, American Apparel Manila for the trumpet on the pinky, with Zoya Jancyn to shade inside the bell of it. For the guitar, I used American Apparel California Trooper as a base, with MAC Brown Bag over it. I also used MAC Brown Bag for the sombreros. Topped it all off with 2 coats of Seche Vite top coat.
Welcome back! ;)
Oh! And Happy Belated Halloween!!
Ask me ANYTHING!
Now's your chance, if you have a question for me, ask it, and I'll answer!
ETA: MAKE SURE TO ASK IT AT THE LINK BELOW! :)
Urban Decay Sale on Hautelook!!
GREAT deals on Urban Decay today on Hautelook!! (think $4.25 for eye shadow duos!) There is mascara, colored mascaras, eyeshadows, lipgloss, palettes, Body powder, even the Summer of Love nail polish set (for $7!)
Head on over! Urban Decay sale at Hautelook!
Rock & Republic stuff is on sale too...I <3 their shoes. lol (can't afford them though!!)


