Thursday, 27 January 2011

QUEEN OF HEARTS


Finger Paints Palette of Petals Spring Collection (PREVIEW)


Holy cuteness. I'm lovin' this new collection for Spring from Finger Paints- and those flower rings?! Adorable. Can't wait to see these in person- I love fun colors!! I think Dahlia My Number and Chysanthe-mum's the Word are my favorites just from the pictures!

Aren't You Glad-iolous?

Carnation Creation

Chrysanthe-mum's the Word!

Dahlia My Number

Did You Ast-her Out?

Heavenly Hydrangeas


Kelier Black Crack Polish from Born Pretty

So Jessica from http://bornprettystore.com/, which btw, has some other amazing nail art items, sent me the Kelier Black Crackle Polish for me to review.
I will say that I had to play with it for a few minutes, to discover the best way to use this Crack polish, and here is what I learned. In order to get the effect I preferred, I needed my base coat to dry 100%. When it was, I applied a pretty thick coat of the Black Crack polish, and waited. Now unlike others I've tried, this one did take a smidge longer for the cracks to appear, but once they did, i loved it! Then I also learned that if you plan on using a top coat, WAIT. The Crack polish needs to be 100% dried. If it is not, when you apply it, it sort of fills in the cracks, and just looks like a plain old black polish.

Here was my final mani....Now I know this look isn't for everyone, but I'm a fan :P


The pic below is where I was playing in the beginning. My ring finger, 3rd finger, was the one that I let my base dry completely, and applied a thick coat of Crack polish over top, and also waited for the Crack Polish to dry 100%.

My pointer, middle & pinky, I also applied dry, but applied a VERY thin coat of Crack polish. This caused TONS of itty bitty cracks, which did look cool, but I preferred the fewer tad bigger cracks. Then you can kind of see how when I applied my top coat while the Crack polish was still semi wet, that some of the cracks vanished, and filled in. It was weird.


If you are interested in ordering from Born Pretty, use my code, CHLOEK31, and get 10% off from now till March 31st, 2011,

Graphic Neon


This week has been crazy X 10. I feel like all I do is work and sleep. (I worked a 17-hr day on tuesday- that is redonk!) I'm trying to get swatches and reviews of new products done, as well as attend to my actual life necessities, like bathing, and putting food in my head. I've got a few things in the next week or so I hope you'll get a kick out of, or at least take something from. I feel bad about all the simple, non-crazy detailed nail designs lately...to be honest, I just don't have the energy, but I'm TRYING, I promise!! :)


I used Nubar Stronghold as a base, with Zoya Dove for the lighter grey and MAC Vestral White with Color Club VOlt of Light over it for the neon yellow dots (man was that color hard to capture correctly on camera, I can never show the actual brightness of it as it looks in real life!) TOpped it all off with 2 coats of Seche Vite top coat.

Don't forget- you still have until tomorrow (Friday) at 11:59 p.m. Pacific time to enter the contest!! :)

Neon Rays

So to start off I apologize for my late responses yesterday, I was without Internet all day, due to the weather here :(

Okay, so I had this idea right after I did my first tape mani in this design. So I finally had the time and just love how it turned out. For this I used China Glaze White on White for the base, China Glaze Four Leaf Clover, China Glaze Yellow Polka Dot Bikini & Color Club She's So Glam, and then Sinful's Black on Black.


This is China Glaze White on White


Then I added Color Club She's So Glam


Then China Glaze Yellow Polka Dot Bikini


and finally China Glaze Four Leaf Clover


Finally I taped it off, you can see the tutorial here.


Wednesday, 26 January 2011

Custom Polish Book Case & Flakie Fun....PIC HEAVY POST

Okay, so for months I've been thinking about how I could 'display' my polish. I insisted on seeing them all, because it's a form of art to me, lol. Well one of our neighbors brothers, can basically build ANYTHING, so he came over, and checked out what I needed and the space I had available. Well this is my new 'Art Piece', lol. I LOVE it, and he made it to match all of our living room furniture since, it's in the living room, lol.
Well...here is my before.. It was a complete MESS, and angered me, every time I had to find a certain polish.


Here is the shelf, empty, and the hubbs


Now it's filled, with most of my polishes, he's so proud! It fit most of them, I might need a sister one, lol 


and my daughter wanted a pic on here too, lol. Oh and the pup, is Grandpa, a 16 year old mix, we adopted a few months ago


Here is the top half


Middle


and bottom

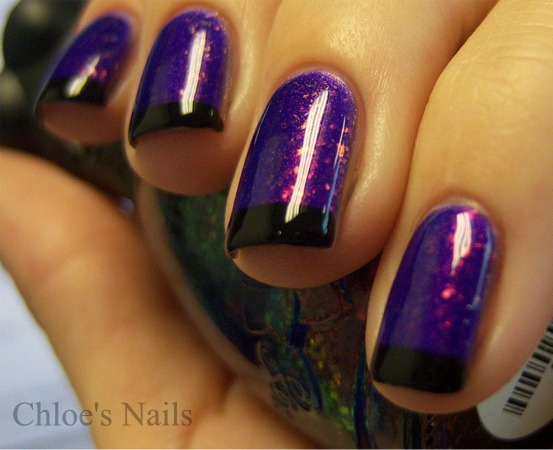
Now onto the mani, as much as I love my Nfu-Oh flakies, well the few I have, I don't find myself using them very often. Well yesterday, I decided to have a little fun with one. Nfu-Oh 51.For this mani I used a base of Color Clubs Fashion Addict, 2 coats of Nfu-Oh 51, my regular black & Essie Matte About You, later down the road, lol, and of course Scotch tape. Here was what my final mani ended up looking like. I actually preferred it, the step before it got to this point. You'll see.


Not only do I ADORE their bottles, but look at the rainbow inside!!!!


This was 1 coat of Fashion Addict, and 2 coats of 51

Then I decided to use Matte About You. I really like matted flakies :)


Then I did a funky french with black tips, and if you haven't noticed, I love mixing up finishes!! This is how I love this mani the most!!


But, being me, I just had to see what it would all look like shiny again.


What do you all think? Do you like matte flakies????

Tuesday, 25 January 2011

Revamped.

Hello!

I've revamped this website a little. Look towards your left <-- and you'll see several new links below I-Nail-It's logo. Thought that might be easier for everyone to navigate. I have added in new services as well, such as the OPI mani/pedi. Do take a look! There are also items for sale. Will be starting work on Monday, so I'll only be able to take in appointments on certain weekday nights or weekends. (:

American Apparel INFO


Since there has been a lot of concern recently about the American Apparel polishes, so I contacted American Apparel, and here's what I found out:

"American Apparel set out to produce this nail lacquer collection with a Made in USA company, and our deep affection for this family-owned corporation was a motivating factor in our decision to work with Forsythe. But one thing we value even more is the safety and health of our customers. This is why American Apparel paid for the costly international recall out of its own pocket, even trading one old bottle for two new bottles of polish to all customers, immediately after we discovered problems with the packaging. We wish no ill-will towards this fellow American manufacturer, but need to seek a fair and accountable solution to this incident."

Hope that calms some concerns. No 'exploding' nail polishes. :)

China Glaze Pom Pom

So as we all can see, my middle finger nub SUCKS! Since I decided to leave it alone and just let it grow out on it's own, I ran to Sally's to pick up Gelous. I've heard quit a bit of talk about it on MUA, and decided to give it a try on my middle finger, just to keep it strong, in the grow out process. My nails are normally really strong, but this is the 2nd break to it in like a month and a half. The first time was a car door, and this time just slammed it in a normal door. Anyways, I just felt the need to baby it, as it grew, lol. I've also started taking Biotin again, to help speed up the process. Okay well, while I was st Sally's I saw this China Glaze Pom Pom. It just called my name, and I knew I had to layer it over a black. It's such a pretty pink glitter, with larger silver glitter in it as well.  Then as you will see, Scotch tape had to get involved, lol.


Oh and YAYAYAYAY, my OPI Black Shatter arrives tonight!!! What shall I layer it over? Any ideas, anything you guys wanted to see?


1 more thing. I wanted to share a cute polish pic, that was posted on MUA. I found the artist, and just love his work. Here is his pic....(not mine, not aff.)
Hahahahaha, I just fell in love.
The artist is Terry Border from Bent Objects. You can see more of his fun unique art HERE. I'm just such a sucker for funny things like this.