Saturday, 25 June 2011

How about some lemonade :)

Okay, so this mani was originally planned to be way more fun, but time ran out :( I had planned on adding some nail stamping, and even some rhinestones, but as soon as I was done taking pictures, my daughter saw I was about to take a breath, and intervened, lol so my 'me' time went all down hill from there, lol. I do love this color for Summer though and so did her school friends :) This is just 2 coats of Orly Lemonade, and it applied beautifuly.


Friday, 24 June 2011

My comfort zone = black tips :)

Morning everyone!! I was in the mood for a semi basic black tip french mani, but wanted to add a tad umph to it, so on my out the door I grabbed one of my fave things, my Big Ruby nail tattoos. I started with a base of OPI Bubble Bath, because in my rush, I couldn't locate my regular go to base. OMG, on a side note, you would all gasp in horror if you saw my stash right now. In all my chaos, it looks as though a bunch of 3 year olds have been playing in it *hangs head* I do plan on getting it cleaned up, once all the birthdays have ended. Well, more organized, and hopefully start pulling some things for my first blog sale :) Okay, so anyways, back to the mani.

Here is 2 coats of Bubble Bath


I then taped off the tips, and used Wet n' Wild black. Since I'm wearing a coral shirt, I decided to use the coral seahorse, from the Sea collection of the tattoos. I love the way it turned out. So simple, yet so me :)


Oh and since it was my boss's b-day, I picked him up some balloons and goodies from the bakery, and saw this pretty little arrangement that I HAD to buy for myself, lol. It def cheered me up :) PS - I will be removing that IMO, awful bow when I get home :P

Thursday, 23 June 2011

Franken: Dorothy's Journey To The Stars!

Hi all!

A couple of years ago I was browsing the web and I stumbled upon this blog post by The Nailphile on the original Dorothy Who?. This is the first polish I fell in love with and it was the beginning of my love affair with nailpolish and nails. I spent the next few days reading her entire blog and when I was done I followed links to other blogs and did the same there.

You can imagine how happy I was when China Glaze announced they would bring the Wizard of Ooh Ahz Collection back! Finally I would have the chance to own this beauty myself! As soon as it came out I bought Dorothy Who? but when I saw it in person I was dissapointed. This looked nothing like the original and frankly, I think the new version is just plain ugly. It's too light and too silvery and kind of cheap-looking.

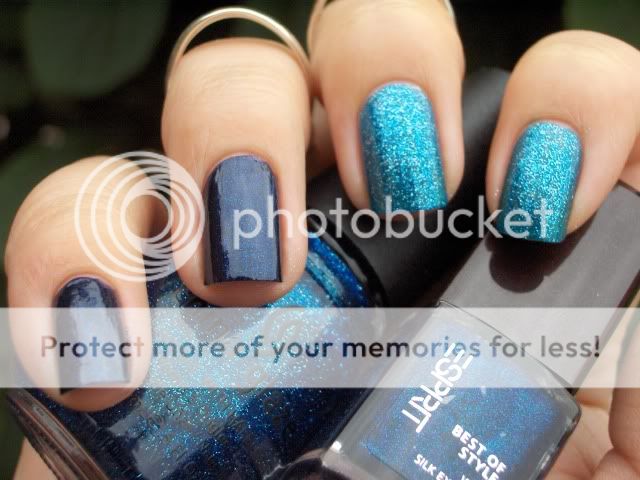
Left: Esprit Metallic Blue, Right: China Glaze Dorothy Who?


Another polish I was disappointed in was Metallic Blue by Esprit. It has an indigo base with turquoise and magenta microglitter and looks gorgeous in the bottle but on the nail the glitter won't show up as much as I would like. I bought this to kill the lemming I had for a darker blue glitter polish like Essie's Starry Starry Night but was not satisfied.

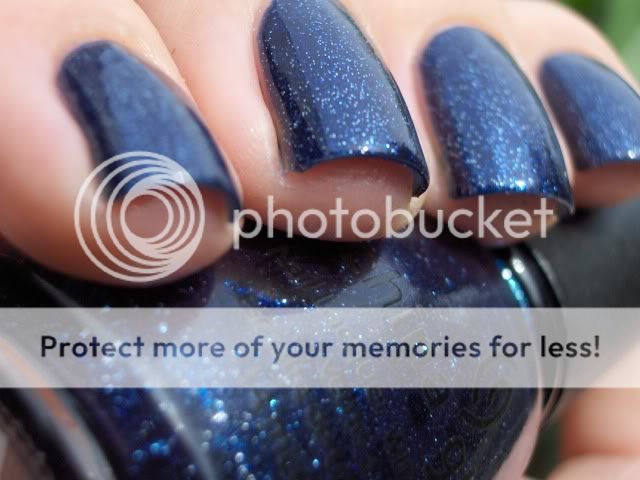
Close-up: left: Esprit Metallic Blue, Right: China Glaze Dorothy Who?


So I did the only reasonable thing to do: I frankened them!


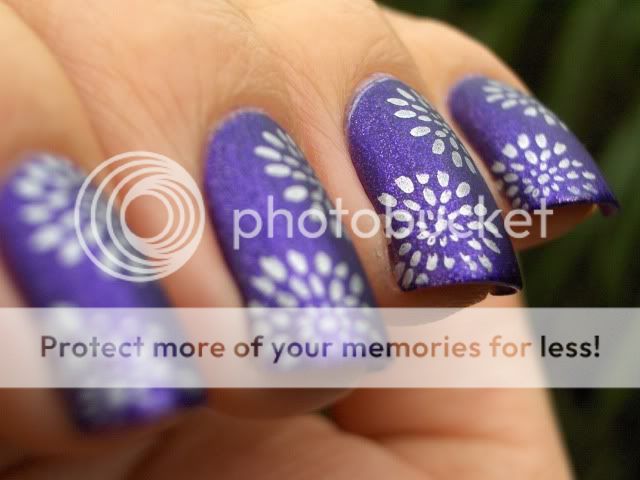
I'm calling it Dorothy's Journey To The Stars.


It looks nothing like the original Dorothy Who? and nothing like Essie's Starry Starry Night but I love it! The different colored microglitters from Metallic Blue give it so much depth!


Unfortunately the sun wouldn't come out and play...


The recipe is fairly simple. I had about half a bottle of Dorothy Who? left after using if for other frankens and the Esprit polish was a 5ml mini so I just added that one to Dorothy Who? a couple of drops at a time until I was satisfied with the color which turned out to be when the entire bottle of Esprit was empty.

I think this franken needs a bit of clear polish to make a a tad more jelly and bring the glitter out more, but the bottle is full so that will have to wait until I've worn it a couple of times.

Thanks for looking!

Wednesday, 22 June 2011

Please life......just settle down a smidge!!

Morning!!! A few birthday parties planned and the flu later, I'm just exhausted. I'm now in the process of planning my girls 9th birthday, and my husbands. Darn all these Summer babies, lol, me included. Summers are just insane lol. I really hope you guys are all doing well :) I have so many manis to show you guys. So I'm going to show you one that my husband chose for me one day that I was just to tired to choose. It's Rimmel's Violet Metal.

I just did 2 coats and forgot how insanely pretty it is on. Can you believe I did black tips on this as well, but forgot to get pics!!! I'm so sorry.


Friday, 17 June 2011

Some new Love & Beauty polishes

Hey everyone :) today I'm showing you one of the four new polishes that I purchased from Forever 21. I'm always checking their site for new polishes, since they are constantly addition g new ones. Well, they had some cool looking new big glitter ones, and this one, it's says it's name is Multi, but I swear on the site it was called, Mardi GRAS, caught my eye first. I loved the color combo. So of course I layered it over black :)


Here are all the ones I got. I'll show you the other 3 soon, I promise


These two have gold shimmer in them!!!!!!


Thursday, 16 June 2011

Catrice Forget-Me-Not Mattified!

I looooooove this manicure. I bought Forget-Me-Not for the sole purpose of mattifying it and I was right, it looks so good matte!


To see more color accurate pictures of what this polish looks like on it's own, check out these swatches from Witoxicity. For some reason my camera made this one look a lot more blue than it is irl.


Just like we've come to expect from Catrice, this applied like a dream. I love their brush, formula and opacity! I used two coats, 1 coat of Nubar Diamont (old formula) and Catrice Nail Expert Matt Top Coat. Then I used Bundle Monster plate BM02 and China Glaze Millenium for stamping.


I'd like to say I got my blogging groove back but I don't want to jinx it. However, I'm having a lot of fun experimenting with polishes and nail-art over the past few days and it's been great to talk to all of you again!

Thanks for looking and until next time!

xoxo Kirsten

Blogger in a China Shop


I know I've said this a million times, and Ill say it again, ideas come from the most unexpected places...the idea for this post came from a manicure I did a while back that also used the two polishes that I used for this manicure. I noticed that when painting the blue over the white, there was a certain amount of transparency near the middle and end of the strokes, and I knew if I diluted it a bit more with clear polish, I could layer it to create a china pattern! I've always loved the look of old china, and though I'd never own it (I'm far too clumsy), I'll admire it from afar...and on my nails! :) I hope that you enjoy my interpretation of antique china patterns!


I used American Apparel Cotton as a base, with ULTA Moody Blues for the china pattern. To make it a tad sheerer in places for layering, I mixed it with Seche Vite top coat. I then topped it all off with 2 coats of Seche Vite top coat.

And because I think I like the thumb better on my right hand....


Wednesday, 15 June 2011

HEADED TO VEGAS!!!!

This friday I head to Vegas to the International Beauty Show. I can't wait to learn more about nails and find some fun new nail art stuff! Yipeeeeeee! Whoooo hooooooo!