Thursday, 25 February 2010

Clean up in 6 easy steps

I know there are so many great articles about this already, but I wanted to show you how I do my cleanup anyway. I get so many questions about how I paint my nails, I always end up searching for articles to refer to. I figured it would be nice to have a reference of my own! There isn't much to it really, so I'll try to keep this post short and simple. Well, here goes..

Nail polish clean up
A blog about nail polishSo, you painted your nails in the best way you possibly could and everything went pretty wel. But it still doesn't look perfect. Yet!

You can leave it like this, or if you're a perfectionist freak like me, you'll try to fix this. There are several methods to smoothen out the cuticle line, like using corrector pens or q-tips drowned in nail polish remover.

Experience has taught me that the method I'm about to show you works best for me! It's really simple, quick and you'll only need two products.
A blog about nail polishFirst thing you'll need is a brush. It's really up to you what kind of you brush you'll use, but using a medium, not too stiff brush is something I would recommend. You might have to try different kinds to figure out what works best for you.

Found the perfect brush? You might want to consider getting backups. The brush will show signs of wear and tear after a while, so you'll need to replace it eventually.

The brush I'm using is a paint brush, so it doesn't have to be a fancy make up brush at all!
Nail polish clean up
A blog about nail polishWhat you'll also need is something to remove nail polish with. Pure acetone is hands down the easiest and fastest solution! However, normal nail polish remover will work too.

Recently I switched back to using nail polish remover, since pure acetone can be very drying. It made my hands look super wrinkly.

I wish I was an expert on this topic, but you might want to look up the negative side effects Acetone can have, before you decide to use it.
A blog about nail polishOk, let's do this! Take your brush and dip it in the Acetone. Make sure you don't have too much on your brush by dapping it on a cotton pad first. If there's too much Acetone the polish will flow into the edges of your cuticles and we really don't want that to happen.
Now, place the brush next to the nail polish line you want to neaten. Sweep your brush lightly, without applying any pressure (Geez I feel like Bob Ross now). You'll only have to take away a slither. Dap your brush on your cotton pad every now and then, because the nail polish will build up in it. You can also use your brush to get rid of any nail polish that has landed on your skin.
Nail polish clean up
A blog about nail polishTadaaa: a pretty smooth line near the cuticle. And it wasn't that difficult at all. It usually takes me about 5 minutes to do clean up, but I always try to apply my nail polish as neat as possible. If your application is a bit messy, clean up will take longer.

There are some things to pay attention to though. Some colors just won't allow you to use clean up. I find that blues, reds and vampies are difficult colors as they tend to flood your cuticles, especially if they're jellies!

Also, you don't want to use clean up on wet nails, I normally wait a good ten minutes before I start.
A blog about nail polishWhen everything is done, it's time for some rehydration!

Cuticles really despise Acetone so it's necessary to use a moisturizer on them, every time after they've been exposed to this hazardous stuff.

Until recently I used different kinds of cuticle oils and balms, but I think I may have found my Holy Grail cuticle treatment: Lemony Flutter by Lush. Rubbing this lovely lemon scented butter into your cuticles will really help them remain soft and hydrated.
Nail polish clean up

The nail polish I'm wearing in these photos is Feeling Blue by Models Own.

This was it for today, I hope you find this helpful! Take care and till next time, xo.

I Feel So Desert-ed.


Hey everyone!! Today's nails are an homage to the seemingly endless span of desert that surrounds the lovely city of sin, booze, hookers, and gluttony that I reside in. :-P No, those aren't bats, they're vultures- the Hunter S. Thompson/Fear and Loathing/Steadman nails are to come in the near future I think. :-D


I used Zoya Yummy as a base, with American Apparel Palm Springs for the desert, then mixed with Zoya Dea to shade. For the cacti, I used L.A. Girl Army Green, that I got at Urban Outfitters, Pure Ice Wild Thing to highlight, and Nubar Forest
for shadow. For the vultures, I used Zoya Raven. Topped everything off with Seche Vite top coat so it'd dry superfast, then topped off the sand portion with Essie Matte About You. :)

Note: No bodies are buried in the desert pictured, unlike the desert surrounding Vegas. ;)


I'm scared...

Models Own heeft mijn gedachten gelezen... *zet aluhoedje op*

Models Own read my mind... *puts on tinfoil hat*


Zie je?! Paarse modderkleur! Ze weten het!
Dit is een van de lakjes die ik van IceRozie heb gekregen voor mijn verjaardag. Prachtig! I kon er niet eens overheen konadden. Je moet niet rommelen met perfectie.

See what I mean?! Purple Mud! They know!
This is one of the polishes IceRozie gave me for my birthday. Beautiful! I couldn't even konad over it. You shouldn't mess with perfection.


De naam is Purple Grey and dat klopt precies. Prachtige rijke mooie modderige paars-grijs. Als ik Models Own om haar hand zou vragen zou ik dan met haar mogen trouwen?

The name is Purple Grey and it is just that. Gorgeous lushious beautiful muddy purple grey. If I would ask Models Own for her hand, do you think they will let me marry her?

Wednesday, 24 February 2010

Gosh - Rainbow

Gosh Rainbow

Hi everyone! How is everybody doing? I hope great :-). Unfortunately I don't have a lot of time today so this will be a very short post, sorry about that!

Let's jump straight to the nail polish: Gosh Rainbow has got to be one of the finest nail polishes Gosh created. It's a top coat filled with orange-green duochrome flakies. Imagine all the combinations you can make with this! My favorite combination has to be with black though. I layered it on top of BeYu's #318, a lovely, easy to handle, black creme. I applied 2 coats of black and only one coat of Gosh Rainbow. The finish of Rainbow is really smooth, not bumpy or gritty at all. Don't you just love the way the colors change?

Oh before I forget: I get a lot of questions about how I paint my nails, especially around the cuticle area. Expect a post about this very soon!

I've got to run now, take care and till next time!

I've Gotta Go No. 2.


hahha. Did the title worry you? :-P

I was laying on the couch last night trying to think of what to do on my nails, and totally not wanting to go out to my car to get my idea notebook. Suddenly it dawned on me, based on my nails yesterday, to do pencils!! :)


I used a mix of China Glaze Salsa and American Apparel Palm Springs for the eraser, China Glaze Millennium for the metal band, and then mixed with Zoya Raven for the shadow on the grooves on the band. For the pencil portion, I used Diamond Cosmetics #319 Lemon Yellow Zest for the pencil color, and then mixed with Electric Orange for shading on the sides of the pencil. Topped off the pencil and metal parts with Seche Vite top coat and the eraser with Essie Matte About You to give it that rubery look, but my lotion made it sorta shiny. damn. Oh well, now it looks like one of those old, hard erasers. :-P

LORAC sale on Hautelook!


Woot!! LORAC Sale on Hautelook- everything starts at $4, almost everything is $4 or $5, and the most expensive item is a palette for $16.50 Head on over. LOTS of e/s, l/s, cheek colors, and palettes. :)

Hautelook


Tuesday, 23 February 2010

Area Rug Nails

I think this manicure reminds me of the red area rug :)
Anyway it was a really quick stamping , with a little bit of bling on it.
i hope you like it.
I recently broke to nails and had to cut it gain - i hate short nails, i am so ready for it to grow long back. I even seriousely considering to may be get a gel nails or something.
I think i screwed my real nail by putting acrylics on top ,now then acrylics is gone my nails are in the really bad shape, even that i wore acrylics for only 1,5 weeks.


H&M - Chicks Envy Me

H&M Chicks Envy Me

Hi guys! Did you all enter my giveaway yet? I wanted to show you another polish that's included in the first set I'm giving away: Chicks Envy Me by H&M. Normally I'm not a red wearing type of girl, but this one is really something else.

First of all, it looks so different from what I'd expected, it's more coral/orang-y red instead of a plain orange. Another surprise: it's not a creme, it's a jelly. Can it get any better, you might ask? Yes! It's on fire! It's so bright, I'd say it's a neon. If I had lived in the 50ies and I happened to be a hot smoldering pinup (a girl can dream, right), I wouldn't go anywhere without this sizzling bottle of nail polish.

So what's the catch? There is none! The formula was wonderful, like with most H&M nail polishes, and it only took 3 coats, which is pretty damn good for a bright jelly. Also: clean up is not a problem with this red! Normally red will flow everywhere if you try this, but not with this polish. If you think you can handle this flaming bottle of fire, go get it or check out my giveaway!

Playing Fast & Loose(leaf)


Today's nails started out in my mind as just sheets of looseleaf paper, but I told my friend Erik (of Vegas Made Me Do It fame) of the idea, and he suggested that I add letter grades, so there you have it.


I used Sally Hansen All the White Stuff as a base, with a mix of Sally Hansen All the White Stuff and China Glaze Salsa for the pink lines, a mix of Sally Hansen All the White Stuff and Zoya Yummy for the blue lines, Zoya Raven for the holes, China Glaze Salsa for the grades, and Essie Matte About You to make it flat. Real pencil was used after the matte dried to draw on the squiggles to look like writing. :)

Did it make the grade?

Tips And Tricks: How To Repair a Broken Nail

Het is ons allemaal wel eens gebeurt: je nagels zijn net op een lengte die je mooi vindt en dan scheurt of breekt een van je nagels. Je kunt de gescheurde nagel afknippen en al je nagels kort vijlen maar als de nagel er niet volledig af is dan kan je ook proberen om hem te repareren.

It happens to us all: your nails are finally at your desired length and then one of them breaks or tears. You can cut the broken nail off and file all your nails short but if the nail is still somewhat attached you could also try to repair it.


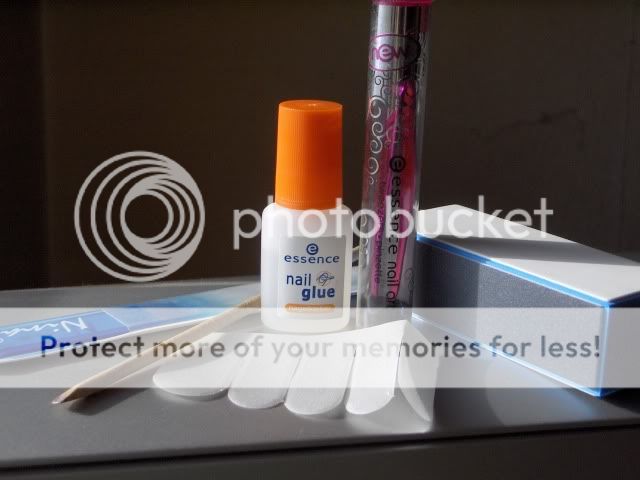
Dit zijn de benodigdheden om een gescheurde of gebroken nagel te repareren:

These are the things you need to fix a broken nail:


  • Nagellijm (neem er een met een kwastje)
  • Silk Wraps (Dit zijn voorgevormde en zelfklevende maar je kunt dit ook per velletje kopen en zelf op maat knippen)
  • Een houten bokkepootje
  • Een pincet
  • Een nagelvijl
  • Bufferblok (Ik vind deze fijn maar een andere vier- of zesvoudige buffer zal ook wel werken)
  • Schaar (Staat niet op de foto)
Heb je een gebroken nagel maar geen silk wraps in huis? Deze methode werkt ook met een theezakje! De papieren variant werkt redelijk maar houdt wel minder lang maar de piramidezakjes werken net zo goed als een echte silk wrap!

  • Nail glue (preferably a brush on glue)
  • Silk Wraps (These are pre-cut and self-adhesive but you can also buy this as a sheet and cut them to size yourself)
  • An orange stick
  • Tweezers
  • A nail file
  • Buffer block (I prefer this one but any four or six-way buffer should work)
  • Scissors (Not in the picture)
Do you have a broken nail but no silk wraps? This method also works with tea bags! The paper kind works fairly well but won't hold as long, the pyramid bags work just as well as real silk wraps!

De eerste stap is om voorzichtig de oude nagellak zoveel mogelijk te verwijderen.

The first step is to remove as much of the old polish as possible.


Dit is mijn zielige gescheurde rechterwijsvinger. De nagel is tot 3/4 ingescheurd.
Omdat dit een erge scheur is heb ik eerst een klein beetje nagellijm aan de linkerkant in de scheur gedaan zodat mijn nagel zijn vorm kan behouden terwijl ik de verdere reparatie doe maar bij kleinere scheurtjes is dit niet nodig. Nadat ik het drupje lijm in de breuk heb gedaan heb ik met het houten bokkepootje de delen van mijn nagel op elkaar gedrukt tot de lijm droog genoeg was om het op zijn plek te houden.

This is my poor torn right index nail. The nail is torn 3/4 of the way.
Because this is a bad tear I put a little bit op nail glue on the left of the tear so the nail can keep it's shape while I do my repair but you don't need to do this for smaller tears. After I put the glue in the tear I used an orange stick to keep both parts of my nail together until the glue was dry enough to hold on it's own.


Daarna haal je de achterkant van de silk wrap en plak je deze over de gehele nagel waarbij je een 'gap' vrijlaat bij je nagelriemen. Ik gebruik hierbij een pincet omdat ik niet teveel aan de plakkant van de wrap wil komen met mijn vingers.

Then you peel off the back of the silk wrap and stick the silk wrap over your entire nail but leaving a gap at the cuticle. I use tweezers for this because I don't want to touch the sticky side of the wrap with my fingers.


Knip voorzichtig de wrap met een schaar op maat zonder in je eigen nagel te knippen.

Carefully cut the wrap to size with scissors without cutting your natural nail.


Breng nu een laagje nagellijm aan over de gehele silk wrap waarbij je ook weer een kleine 'gap' vrijhoudt bij je nagelriemen om te voorkomen dat je de nagel aan je huid vast plakt. Naast het feit dat het onprettig voelt kan er dan lucht onder de wrap komen en in die ruimte kunnen nare bacteriën en schimmels gaan groeien. Als er wel lucht onder de wrap komt na een paar dagen, week deze er dan volledig af en vervang hem voor een nieuwe.

Now you can put a coat of nail glue over the entire silk wrap leaving a gap near the cuticle to prevent glueing your nail to your skin. That wouldn't only be uncomfortable but it can also cause air to get under the wrap which can cause nasty bacteria and fungals to grow under the wrap. If you do get air bubbles under the wrap after a few days just soak off the wrap completely and apply a new one.


Als de lijm volledig droog is kan je een tweede laagje nagellijm aanbrengen. Laat ook deze weer goed drogen. Bij ernstige breuken zoals de mijne zou je vervolgens een tweede silk wrap aan kunnen brengen met nog twee laagjes lijm.

After the glue has dried completely you can put on a second coat. Let this dry completely too. With serious breaks like mine you could to a second wrap and two more coats of glue.

foto gebuft

Als de lijm goed droog is (het droogt mat) pak je je buffer en vijl je voorzichtig je nagel glad. Let op dat je niet door de silk wrap buffert maar vijl alleen oneffenheden weg.
When the glue is completely dry (it dries matte) you take out your buffer and gently file your nail smooth. Be careful not to file through the silk wrap and only file away the uneven parts.

Vijl met een normale vijl ook de overstekende stukjes van de wrap glad.

Use a regular file to file away any pieces of silk wrap that extend past the free edge.


Je nagel is gerepareerd en klaar voor nagellak!

Your nail is fixed and ready for polish!


Afhankelijk van welke remover je gebruikt kan zo'n reparatie tot zelfs drie weken blijven zitten.
Ik ben zelf allergisch voor acetonvrije remover en ik lak mijn nagels vaak dus bij mij blijft dit niet heel erg lang zitten maar door af en toe een nieuw laagje lijm aan te brengen kan ik dat nog wel rekken tot ongeveer anderhalf á twee weken. Niet slecht voor iemand die bijna dagelijks lakt toch? Gebruik je acetonvrije remover en lak je je nagels minder vaak dan zou de wrap moeten kunnen blijven zitten tot de breuk volledig is uitgegroeid.

Depending on what remover you use this wrap can hold up for up to three weeks. I am allergic to acetone-free remover and I polish my nails a lot so mine won't stay on that long but with an extra coat of glue every now and then I can stretch it to about a week and a half or two weeks. Not bad for someone who polishes almost daily is it? If you use acetone-free remover and don't polish your nails this much the wrap should be able to hold until the break has grown out.

Om de wrap te verwijderen gebruik je dezelfde methode als voor glitternagellak. Doe een beetje pure aceton op een watje of stukje vilt, leg dit op je nagel, pak je vingertop in met aluminiumfolie en laat een paar minuutjes zitten. Daarna veeg je zonder problemen de gehele wrap in een beweging van je nagel.

To remove the wrap you can use the same method as I use for glitter nail polish. Soak a cottonpad or piece of felt in pure acetone, put it on your nail and wrap your fingertip in tin foil and leave it for a couple of minutes. Then you can just swipe the whole thing off in one clean swipe.