Monday, 31 May 2010

On Memorial Day


In Flanders fields the poppies blow
Between the crosses, row on row,
That mark our place; and in the sky
The larks, still bravely singing, fly
Scarce heard amid the guns below.

We are the Dead. Short days ago
We lived, felt dawn, saw sunset glow,
Loved, and were loved, and now we lie
In Flanders fields.

Take up our quarrel with the foe:
To you from failing hands we throw
The torch; be yours to hold it high.
If ye break faith with us who die
We shall not sleep, though poppies grow
In Flanders fields.

-John McCrae, 1915


I remember every memorial day weekend growing up my mom would always have a crepe paper poppy attached to the strap of her purse, and I remember that whenever I was with her, she would give me a dollar to donate so i could have one too. I loved those little paper flowers, though I hardly understood their significance way back then. Memorial Day is for remembering, for honoring, and for thanking those who have given their lives, or are risking their lives to make sure that we have the rights and liberties that we have here in America. My grandfather was a veteran, and I remember visiting his and my grandmother's graves every Memorial Day and looking at the flags pushed into the earth of their graves. My sister played TAPS on her trumpet at the cemetery, so it was mostly my mom and I, since it was her parents. I suppose that I'm blessed in the fact that not many of my loved ones (friends or family) are in any branches of the military, I have a couple of friends serving in various branches, and for that, I thank them, but I never have to worry about a family member not coming home, like so many others in this country. Regardless of that fact, I extend my thanks and eternal gratitude to those serving this magnificent, though sometimes flawed, country of ours. In honor of our armed forces, I did the logos for the Marines, the AIr Force, the Navy, and the Army, as well as the American flag accented with what else, a poppy. :) I apologize that the logos aren't perfect, but I did what I could with the space I had. ;)


I used:

Thumb: American flag & poppy

American Apparel Cotton as a base with CND Anchor Blue for the blue, and China Glaze Salsa for the red of the stripes as well as the poppy. for the black I used American Apparel Hassid, and for the green, I used CND Green Scene .

Index: Marines

American Apparel Passport Blue as a base, with China Glaze 2030 from Khrome Collection for the gold, and China Glaze Salsa for the red, over Sally Hansen All the White Stuff, so the red popped.

Middle: Air Force

China Glaze Millennium as a base, with CND Anchor Blue for the logo.

Ring: Navy

Sally Hansen All the White Stuff as a base, with American Apparel Passport Blue, China Glaze 2030 from Khrome Collection for the gold, Sally Hansen All the White Stuff for the shield, with CND Anchor Blue for the blue on the shield, and China Glaze Salsa for the stripes on the shield.

Pinky: Army

American Apparel Hassid as a base, with Sally Hansen All the White Stuff for the star, and outlined in American Apparel Manila.

Topped everything off with 2 coats of Seche Vite top coat.

Review: Sally Hansen Nail Quencher Hydrating Base Coat

Sally Hansen Nail Quencher Hydrating Base Coat

Hi everyone! I'm sorry for another review, I'll be posting nail polish again very soon! But I'm in dire need of some advice so I'll start off with this review about Sally Hansen's Nail Quencher Hydrating Base Coat.
Please note: this product is discontinued so maybe this review isn't relevant for everyone, however I found some places where it's still easily available, so I figured, why not?

Sally Hansen Nail Quencher

I actually got this product because I had heard many many ravings about it, it's a holy grail base coat for a lot of nail polish junkies out there! In the first weeks of using it, I thought it was pretty ok: my nail polish didn't chip right away, and it prevented staining rather well.

But after a few weeks it became painfully clear: I don't like it. At all. And I think it's safe to say that, because I finished an entire bottle!

It goes on pretty thick due to its gel-like substance, I figured this is why my nails weren't as stained. But it bubbles, like crazy. And honestly, I don't want a base coat that leaves my nails looking like a moonscape.
The emptier the bottle, the thicker the base coat got. It even got stringy on me, and therefore highly unmanageable.

The drying time wasn't great either, I actually had to wait a good 5 minutes before I could get on with the rest of my manicure. Another disappointment was the brush, it's small. I don't want to spend too much time on applying something exciting as a base coat, so I need at least a medium sized brush and something that dries quickly.
So overall, it's safe to say, this base coat is not working out for me.

Please help me!

And that brings me to the following question:
What base coat do you use or would you recommend? So far I've tried OPI Natural Base Coat, OPI Ridge Filler and the Sally Hansen. Please help me out!


Thanks so much for stopping by! -
Michèle

Follow up

Hi everyone, I did a quick follow up because you were all so incredibly helpful!! Thank you all so much for sharing your experiences with me. After reading all your comments I think I'm going to give either Nail Tek or Essie's Protein Base Coat a try. Of course I'll review these at some point for those who haven't tried these. Wish me luck and thanks again!

Your recommendations

Sunday, 30 May 2010

Lime Line


Today is another simple one, my apologies- it's been a super busy weekend- I made about 10 dozen cookies along with a bunch of other stuff!! :-P I used another of the new ULTA polishes that I got, In the Limelight, a lime green foil finished polish. Anyway, sorry for the short write-up, it's been a long day and I think its about bedtime.


I used ULTA In the Limelight as a base, with American Apparel Hassid for the lines. Topped it all off with 2 coats of Seche Vite top coat.

Saturday, 29 May 2010

ULTA-mate!


Today's manicure is simple, because I was busy busy today! :( I did get an AWESOME new Ulta Professional polish though, so I had to use it- unfortunately it was the only one left in the cardboard display (it's part of a special collection), and there is no label on it, so I don't know what the name of the color is, but I plan on investigating tomorrow... so not to worry, I'll update it in the info. It's gorgeous- a vivid pink with a LIME GREEN reflect?! Sign me up. Awesomeness. LOVE. Anyway. They also had in the same display a lime green FOIL polish- which had a label (In the Limelight), which is gorgeoustastical, I can't wait to use it too...I LOVE foils.


I used ULTA Professional awesome color with no label as a base, with China Glaze Cherish applied with Bundle Monster plate BM03 just to the upper corner of each nail. :) Topped it off with 2 coats of Seche Vite top coat.

Review: Lush Handy Gurugu

Lush Handy Gurugu

Hi guys! Maybe it's just me, but when I'm in love with a product, things often go wrong.. My favorite hair mask: discontinued. My favorite veggie salad: not so veggie anymore. My favorite hand cream: they changed the formula. Can you believe this? I'm not kidding! But in a way I'm glad, because in the search of the next perfect hand cream I found a match. In fact, I love it even more than the previous cream I've been using.

Lush Handy Gurugu

First of all, Gurug..what?! Hell, I don't even know what it means but I do know Lush's Handy Gurugu is something special. Lush did this lovely writeup on their website:

You'd think because this hand lotion has such a light and fluffy consistency it would be lightly moisturizing, but Handy Gurugu is a rich cream that sinks in quickly and really goes to work on dry, sore hands. We mix in a multitude of butters including fresh Shea butter, purchased fairly from women who whip it up by hand in a village in Ghana (they're really strong - trust us we went and tried to whip it up ourselves and let's just say our arms were quiet puny compared to theirs)

And, as far as I'm concerned, they're not lying! Handy Gurugu is fabulously fluffy and light yet really moisturizing. It's quickly absorbed and doesn't leave my hands greasy (as with Smitten, which would be great for extremely dry winterhands), which is a major plus. I love the smell too. The scent is very strong though, I think you'll either hate or love it, it's definitely not for everyone. It reminds me of a giant herbal explosion; it smells extremely earthly. The smell lingers for a long time too, I can smell it almost throughout the entire day. If this makes you feel a bit reluctant, I'd suggest a little batting of the eyelids and ask for a sample to try it out!

For some people the packaging could be a downside, because it's in a tub you'll have to stick your fingers in it. If you don't want cream under your nails, use your knuckle to get the product out of the tub, I do this with day creams as well!

I love how Lush uses only cruelty free and fair trade ingredients. This is most likely bustin the price as well, but I don't mind paying a bit more for a good cause. The price of Lush products vary a lot depending on the country you live in, here in The Netherlands a jar of Handy Gurugu retails for €12,95 for 100gr (or $16 for 3.4oz)

So in conclusion, I found a new love in Handy Gurugu, if you ever happen to stumble upon a Lush, I'd say at least ask for a sample!

Ingredients

Rose Water (Rosa centifolia), Fair Trade Organic Shea Butter (Butyrospermum parkii), Glycerine, Stearic Acid, Organic Almond Oil (Prunus dulcis), Triethanolamine, Fresh Lemon Juice (Citrus limonum), Vanilla Absolute (Vanilla planifolia), Rose Absolute (Rosa centifolia), Chamomile Blue Oil (Matricaria chamomilla), Organic Evening Primrose Oil (Oenothera biennis), Organic Peanut Butter (Arachis hypogaea), Organic Pumpkinseed Butter (Cucurbita), Organic Cashew Nut Butter (Anacardium), Organic Almond Butter (Prunus dulcis), Tincture of Benzoin (Styrax benzoin), Cetearyl Alcohol, *Benzyl Salicylate, *Coumarin, *Geraniol, *Benzyl Benzoate, *Farnesol, *Limonene, *Linalool, Perfume, Chlorophyllin, Methylparaben, Propylparaben.

Friday, 28 May 2010

Schlongs & Songs


(sorry dad) :-P Tonight I'm going to a show called Naked Boys Singing here in Las Vegas. If you haven't heard of it, it precisely what it sounds like- buff, attractive men singing in the nude. Should be a good time. ;) So, today, for shits and giggles, I decided to attempt to paint the poster on my nails. What is it with me and naked men on my fingernails, seriously? :-D BTW, it is effing HARD to paint tiny little naked dudes on fingernails. HARD! (hee hee) Luckily, because I added the 'censor' bar to make it PG, I didn't have to paint any tiny penises.... or is it penii? ;)

the inspiration:


the nails:


I used OPI Who the Shrek Are You? as a base, with American Apparel Cotton as a base for the dudes and the orange stripe. For the orange stripe, I used essie Tart Deco, for the boys, I used MAC Abalone Shell, then shaded with Nubar Milk Chocolate Creme. For the black bar, I used American Apparel Hassid. Topped it all off with 2 coats of Seche Vite top coat.

How do you like your boys to sing? :-D

How to: Ruffian!

Hi everyone! Today I'm writing about how to do a Ruffian. I've got this request from the lovely Natasja so here it is!
This manicure is created by Creative Nail Design (CND) especially for the NYFW Ruffian Fashion show. Since then everybody has been calling this manicure the Ruffian, or Ruffian inspired, manicure.
Although it has been around for a few months now, I still think it's hot! It's like the revamped funky french if you ask me.

I've seen different techniques on how to do this, but I do this in a very simple way. A lot of people use french tip guides or other stickers to create that curve, but I always make a huge mess when I even look at guides. I actually just apply the ruffian like I would with a normal manicure, I just start higher up.

I made pictures first but they all came out blurry, so I decided to draw them!


1. Start off with a clean nail, apply base coat.


2. Apply the base color of your choice. This is how I do it.


3. Place a drop of polish at the center of the nail, a bit above where you want to start the ruffian.


4. Carefully push the drop downwards, to where you want the ruffian to go.


5. Now move your brush upwards making a straight line till the end of the nail.


6. Go back to the base of the ruffian and swipe the polish along the curve of the nail.


7. Keep dragging the polish until the whole side of the nail is covered.


8. Repeat step 6, but do this on the other side of the nail.


9. Repeat step 7, but do this on the other side of the nail.


10. You're all done! Finish with a (quick drying) top coat.

Some other tips:

  • I would recommend only using 1 layer for the ruffian, otherwise it will look like it's really laying on top
  • Practice, practice, practice
  • Don't choose a base color very close to your skintone, or it will look like you have a major gap.
  • If you think Ruffians are a bit too much you can always use 2 colors that are close or experiment with matte and glossy.

ManGlaze Ruffian manicure
Ruffian made with ManGlaze Matte is Murder and regular top coat

Thanks so much for stopping by!
- Michèle

Thursday, 27 May 2010

IMPRESSION NAIL ART AND MORE

I'm going through a phase again this time it is with young nails impression tools. If you think these nails are wild and crazy you should meet this client of mine! LOL

This is one of the newest glitters from sparklesnailproducts.com. I added the white star using an impression nail stick from youngnails.com. Everything I have purchased from young nails has been amazing and has really made my job so much easier! Thank you Young Nails!

All of the dots (except for the black polish dots) in this design are done with acrylic. I used golden halo from sparklesnailproducts.com as the base color.

Super fun confetti nails. I mixed this confetti with clear acrylic. I just love when it's so easy to do something that turns out so cute.

This is opi gel nail polish in louvre me louvre me not. The white star is a sticker that changes colors in the sun!

I used 3 different colors of purple on these nails and added some moody confetti from young nails. I added some silver and black polish to really give them that extra edge! I loooove these!

A classic black and silver design.

I'm loving this bright yellow. It's from the neon glitter collection at artglitter.com.

The color of these nails is blue and yellow but my camera just doesn't like to photograph the lighter colors as well. I'm sure it's probably the photographers fault.

The rule when I do nails is if you don't decide on a design or color then chances are you'll probably get purple! I embedded all sorts of different things in these nails and also used an impression tool from young nails to make a star on a few of the nails.

Getting Carried Away


I'll admit it...I'm a HUGE Sex and the City fan. Love every fashion-filled, cosmopolitan-sipping moment of it. (especially those moments that include Aidan, AKA John Corbett... *drool* <---been dreamy since Northern Exposure) I would kill for Carrie Bradshaw's wardrobe and shoe collection (mostly the shoe collection- I'm a big shoe collector in addition to my nail polish ;)) Anyway, my roommate and I, along with a few other girls, are going to see Sex and the City 2 tonight, I'm super excited!!! I'm curious to see what happens with the Aidan bump-into. (hell, I'd pay the $12 just to stare at him on screen for 2 hrs). The ring finger nail in today's design is way over the top (hence the 'Carried Away' tie-in in the title). Hope you like them! :) Sorry they're a tad shaky though, I was shaking so badly while I was doing them that it was impossible to draw straight lines!! Also, check The Daily Nail: REVIEWS later tonight for a review of the ULTA Glam Goth collection! :)


I used American Apparel Hassid as a base for the black nails, and Zoya Trixie for the jeweled nail. For the pink of the skyline, and logo, I used Massini Power Pack (an inexpensive brand that midwesterners can find at Meijer, but I'm not sure where else to purchase it), and the rhinestones were from Michaels Crafts. :) Topped it all off with some Seche Vite top coat, and away I go. :)

Who's your favorite SATC character- male or female?

Aidan....*sigh*

Wednesday, 26 May 2010

Mum's the Word


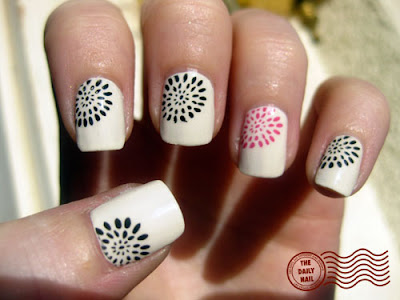
So today I did some swatching of some new colors I snagged at ULTA (post will be up tomorrow), so I didn't have a ton of time left in the day to do an awesometacular design, but I love how simple and striking the palette and image I used for today's design are. I used another of the Bundle Monster plates for this design, I think that it looks like a stylized version of a Chrysanthemum, or 'Mum'.


I used American Apparel Cotton as a base, with American Apparel Hassid for the black mums and Essie Foot Loose for the pink mums, which I applied with Bundle Monster plate BM02. Topped it off with 2 coats of Seche Vite top coat.

Today was an awesome day- the story that was written about me for the Las Vegas Weekly Magazine was posted online, and the print version hits newsstands tomorrow here in Vegas!!! :) I'm thrilled!!

Las Vegas Weekly: Nailed It!.

I loved the article- and the last line was a perfect ending! :-P

Simple , but nice

This is a really simple but in the same time super nice ring + nails set.
I know i have not been posting a lot recently, i guess i need a little break and also having a very very busy life right now.
I still have tons of pictures of my nail art, and i hope i ll catch up with posting soon enough.I hope you enjoy the mani.


ManGlaze - Franken Jugg's

ManGlaze Franken Juggs

Franken Jugg's™, FRANKEN-STEINS™ by MANGLAZE®

Creating a monster? These big EMPTY juggs have a wide mouth. Naturally, they'd come in pairs but then we thought why not 3 juggs? Our dumbest idea yet is the biggest industry innovation since ...matte nail polish. Sexy monster by Australian artist Tegan Coddington!
3 for $3.33 + S/H (Web exclusive. Not available in stores)


That's what the ManGlaze website says about their juggs. Don't you just love this concept, or their wit? If you don't know what a Franken or Frankening is: Frankening a nail polish means your creating your own custom nail polish mixing other existing colors or pigments. A lot of people clean out old bottles especially for this, but that's such a drag! ManGlaze has a solution for this, their Frankening Juggs! You get these in a set of 3, mixing balls included!

First: the artwork is AMAZING. I don't know any nail polish brand with labels this awesome. And wait, do I see the Iron Maiden font there? Love. The label also allows you to write down the name you've made up for your own custom color and the ingredients you used. So cool!

Second: The bottles have a very wide opening which really comes in handy when you're pouring all kinds of stuff into it. Don't fill 'm up completely, because the mixing needs some room. When you're done simply close the lid and shake! Now this is where things get a little tricky though. Since the opening is very wide the nail polish automatically adheres to the cap, so when you open your jugg make sure you don't have a lot of nail polish dripping down, because it can get messy. The only solution to this would be making a smaller neck, but then the whole mixing process wouldn't be as easy. The brush is a bit stiff, but nothing unmanageable. (and apparently all new bottles already have an improved brush!)

ManGlaze Franken Juggs

I would have attached a picture of the Franken I made, if it didn't fail that miserably. It just wouldn't dry! That leaves me with this tip: if you're Frankening with different types of nail polish, good old toxic nail polish combined with b3f nail polish, it's possible to run into problems like this!

Anyway, if you're ordering ManGlaze polish, make sure to get these too, they just rock so much!

Do you Franken?

Tuesday, 25 May 2010

How Geeky!


For those of you not in the know, today (May 25) is known as Geek Pride Day! :) So in honor of the day, I painted 'geeks' on my nails. Not the carnival sort of geek, but the nerdy sort... since there are two definitions. ;)


I used MAC Abalone Shell as a base, with American Apparel Hassid for the frames of the glasses, as well as the eyes and outline of the nose. For the shading/mouth line, I used a mix of MAC Abalone Shell and Nubar Milk Chocolate Creme. For the lenses of the glasses, I mixed Sally Hansen All the White Stuff with Orly Snowcone, and for the unibrows, I used Nubar Milk Chocolate Creme for all but the ring finger, which I used CND Electric Orange mixed with a touch of the Nubar Milk Chocolate Creme, also, for the teeth I used Sally Hansen All the White Stuff. I topped everything off with two coats of Seche Vite top coat because who doesn't like shiny geeks.

So, how many digits of pi do you know? Do you speak 1337? What is your character in World of Warcraft? ;)

Dare Mani!

Missnono op MUA (oftewel EvilAngel van http://blacknailpolishandlipgloss.blogspot.com/) heeft een ouderwetse 'dare' op de nailboard gehouden afgelopen weekend. Iedereen die mee wilde doen kon een 'dare' krijgen voor een manicure. De mijne was "De felste paars die je hebt met groene stippen" dus hier is ie!

Missnono over at MUA (AKA EvilAngel from http://blacknailpolishandlipgloss.blogspot.com/) organised a good old-fashioned dare on the nailboard last weekend. Everyone that wanted too could get a dare from her for a manicure. My dare was "the brightest purple you own with green polkadots". So here it is!


 In the sun

Sinful Dream On, een paarse neon, gestippeld met een groene neon zonder naam of merk. De schaduwfoto komt het meest in de richting van de kleur maar dan veel intenser.

Sinful Dream On, a purple neon polkadotted with an unnamed, brandless green neon. The shadow pic is closest to the real colour but it's much more intense.


In the shade
Helaas is het onmogelijk om neons goed op de foto te krijgen maar geloof mij maar als ik zeg dat deze mani OPVALLEND is! En ik ben er gek op!
Bedankt voor de uitdaging Andrea!

Unfortunately neons are impossible to capture on camera but believe me when I tell you this mani is In. Your. FACE! And I love it!

Thanks for the challenge Andrea!

Ik heb mijn oude camera weer in gebruik genomen. Hij werkt alleen nog als hij aan de stroom ligt maar de foto's zijn zoveel beter dat het de moeite wel waard is. lol Hij is van mijn opa geweest dus ik zou het erg fijn vinden als ik hem gewoon kon gebruiken. Hij was dol op deze camera! Mijn opa was sowieso nooit bang voor nieuwe gadgets. Hij leerde gebruiksaanwijzingen haast uit zijn hoofd als hij weer een nieuw elektronisch speeltje had. Hij heeft zichzelf geleerd om een computer en digitale camera te gebruiken en hoe hij foto's moest editten en dat allemaal terwijl hij al over de 80 was.
Toen hij 85 werd hebben de kleinkinderen hem deze digitale camera gegeven en we waren allemaal verbaasd toen we de volgende ochtend begroet werden door een email in onze inbox met een foto die hij zelf had gemaakt en ge-e-maild terwijl hij de computer ook nog maar pas had.

Dus deze camera mag dan een nieuwe batterij nodig hebben en hij mag dan rottig in gebruik zijn op deze manier maar ik moet hem gewoon gebruiken en hem maken. Daarnaast zijn de foto's ook gewoon veel beter, scherper en kleurechter.

By the way, I brought back my old camera. It only works when it's hooked up to the power cord but the pics are so much better it's worth the trouble. lol It used to be my grandfather's so I would really like to be able to use it. He loved this camera! My grandfather was never afraid to try new gadgets. He used to memorize the manual whenever he got a new electronic toy. He taught himself to work a computer and how to use a digital camera and edit photos and all that when he was well over 80 years old. 

When he turned 85 the grandchildren got together and bought him this digital camera and we were all amazed that even though he had never worked with a digital camera, and he had only gotten a computer very recently, we all had a picture, emailed by my grandfather himself, waiting in our inbox the next morning.

So this camera might need new batteries and it might be a pain to use it in it's current state but I just have to use it and get it fixed. Besides, the pictures are also a lot better, sharper, cleaner and more colour-accurate.

Monday, 24 May 2010

The Collection as of 5/24/10


I get quite a few requests asking to see my collection of polishes, so for those of you that are interested....


The Daily Nail polish collection, modest compared to some, excessive to some people (like my mom ;)) but perfect for me (until the next pretty polish comes along)....

China Glaze:


Zoya:


Essie/OPI:


American Apparel (not all are shown- I have all but the topcoat and Rose Bowl, just thought the polish rainbow was pretty ;)):


American Apparel/butterLONDON/Sinful Colors/Color Club:


Nubar/MAC/Creative Nail Design (CND):


ORLY/Piggy Polish/Milani:


Sally Hansen:


Urban Outfitters/Pure Ice/ULTA/Barielle:


Dare 2 Wear/ALDO:


Miscellaneous 1 (Nfu Oh, Hot Topic, Kleancolor, Goldie, BB Couture, etc):


Miscellaneous 2 (mostly minis, with some striper polishes):


There ya go. :) Hope you don't think I'm as nuts as my family does. ;)