Sunday, 28 February 2010

See you on Friday!

Hello my Dear Nail Art Lovers.
Tomorrow morning we are leaving for the San Francisco trip - gosh i am so super excited, this is going to be my first time in California. We going to spend where 4 romantic days full of all kind of exciting plans. So as of right now - bags are packed and nails are done.
I am going to post today nail that i have done for the trip, i hope that glitter top coat will help it last for 4 days, and neutral colors will not annoy me.


And here is a picture of my Wonderful and beautiful Kot Marshal - i guess your are so surprised on how big is he now :) He is wonderful, amazing, very loving Kot (Kot means cat in russian, but htis is how we call him around here) and i am goign to miss him so much. My friend is going to coame take care of the kot and dogs 2 times a day while we are gone, so special thanks to her :)
I hoped i can use this cool picture of Marshal as an excuse for not posting much lately.
When my Dad saw this picture he said that it must be called somehting like - "Mmmm... Those owners were delicious..." :D

Also please check out my post that i made earlier this year, with the manicure that i called San Francisco Nails :) I guess i was just inspired by the dream of cisitng Sanfran, and i am so happy that my dream is cumming true.
SAN FRAN NAILS POST

Jumping Through Hoops


So tonight are the Closing Ceremonies, and lots of people have requested that I do Olympics nails over the course of the past few weeks, and wellllll, tonight is my last chance!! Pardon the shakiness, I just got home, I went to class from 8-1, hockey game from 130-5?, and drinking from 5-7 or so with some buddies from work. Good times. Note to self: NEVER drink Newcastle after SUPER-hoppy IPA, will taste horrible and like nasty caramel. Anyway, on to the nails.


I used Sally Hansen All the White Stuff, China Glaze Salsa for the red, Pure Ice French Kiss for the blue (and mixed with Sally Hansen All the White Stuff for the midsection of the logo body), Zoya Raven for the black, Diamond Cosmetics #319 Lemon Yellow Zest for the yellow, and Nubar Forest for the green. Topped everything off with 2 coats of Seche Vite top coat.

Congrats to all the countries on a job well done at the Olympics!! :)

Ruffian Inspired Manicure & The most awesome gift

Ruffian Inspired Reversed Moon

There's this amazing manicure that I've been seeing around. The Ruffian Inspired or reversed moon mani as it's called. Since I adore moon mani's (Dita von Teese, wow), I wanted to try it! Also, I promised the lovely ladies from the Dutch boards to do a full mani, so here it is!

I've seen so many pretty ones already on the blogs, mine is a bit boring, but I like it nonetheless. It may look a bit better on shorter nails though, what do you think?
The colors I've used are China Glaze Millennium and OPI - Lincoln Park After dark matte. Only one coat of each! I never use the matte because I was so disappointed when I found out how dark it was, it's nothing like the original shade! However I think it fits well in this manicure. I'm definitely going to do this again, but with other colors.

Monkey Nail Polish Dryer

I also wanted to show you a gift my best friend gave me today! He also got me 3 gorgeous nail polishes, but you'll see them making an appearance on my blog soon enough ;-). Look at this cute little monkey! I absolutely adore it. What (the hell) is it, you might ask? It's a nail polish dryer! When you put your hands on the banana button, the monkey will blow air at you. It's so damn cute, it makes me feel all fuzzy inside. If you're reading this: dank je wel!!

You can obtain this cute little fellow at www.freefalluk.com

This was it for today, dear readers! Take care and till next time.

Misa - A Sin Worth Committing

Misa A Sin Worth Committing

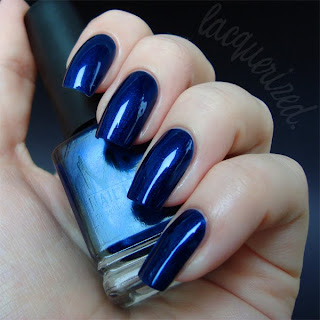
Hi everyone! Today I wanted to show you a very special polish. This amazing polish was a gift from Kyosuke, thank you sooo much, I love it! Kyosuke has been a faithful and very supportive reader from the moment I started blogging!

This nail polish by Misa is a true beauty, its name is A Sin Worth Committing and it belongs to the Poisoned Passion Collection that came out in 2008. I'm a sucker for blues, and this one's just perfect, not too dark or light and it's packed with amazing shimmer. This color takes me to far far away lands where stars happily sparkle and the nights never end. To top it all: the application was a dream too, I think Misa nail polishes may have the best formula I've experienced so far. They apply so smoothly and after 2 coats you're done and you can hop back on your carpet with Aladdin!

Misa A Sin Worth Committing

Thanks for stopping by and take care!

Saturday, 27 February 2010

It Ain't Easy Being Cheesy


Today's nails were inspired by something... and I'll give you a hint... They're little, and cheesy, and sometimes I have them for breakfast with my Dr. Pepper.... If you guessed Cheetos- YOU'RE RIGHT!! :-D I mixed both the mascot - Chester the cheetah's spots, with the orange funk that always covers your finger tips after a few of the electric orange morsels of deliciousness.


I used Sally Hanson Hard As Nails Xtreme Wear in 06 Sun Kissed as a base, with Zoya Raven applied with Konad Plate m57. For the orange Cheetos film on the tips, I sponged Electric Orange over the Konad pattern, and then sponged Essie Matte About You over top of it. For the shiny portion of the nail, I used Seche Vite top coat.

Dangerously cheesy.

NEON, MIRRORS, 3D AND MORE!

I got this idea from Young Nails again! They are amazing! I am soooo glad I attended the Young Nails class I just wish they had one every week. These acrylic colors are from the Young Nails neon collection and I used polish to paint the tiger stripes!

I stole this idea from a very talented girl I met at a Young Nails art class. Thank you for the inspiration Krizia! I love your ideas!

This is 3d nail art that I created with acrylic. I put the 3d art right on the nail and then covered it with clear acrylic. The nail is smooth to the touch but you can still get the 3d effect. I have to admit I was proud of myself for doing these.


This is snakeskin print done on bright summer colors. I looooovvveee the snakeskin and this awesome client!

This is mirror confetti from Young Nails!

More sparkles nails!

This is some impression nail art. I love how vibrant these colors are!

Colourful triple french nails!

Did this set of acrylic nails in Jan. Favourite ♥.


Clear acrylic nails with some glitter on the nail bed. Hand painted the french design using acrylic paint. I would totally ♥ to have nails like this.


Adore her nails. Long pretty nail bed.
This is how an acrylic extension should look like from the side view! All thanks to my teachers from Pink Room. :D


Bows that look like angel wings. Therefore, angel bows. ♥.

Friday, 26 February 2010

That's Gonna Cause a Gummyache.


Ok, so today's nails are an homage to Fish. Not the cold, scaly, stinky kind, but the dude I work with, whose nickname is Fish. The plan today was to test his theory that he could eat a 5 lb gummy bear in one sitting. Unfortunately though, the company we work at caught wind and said 'No way Jose, not on OUR property!' So we went to Buffalo Wild Wings for lunch and he attempted the gastronomical feat there. The goal? See how much he could eat of it in a mere hour. Let me say, we were ALL impressed. He ate over 3 POUNDS of gummy bear in 1 hour. PLUS- the only reason he stopped is because we had to go back to work, he came back from lunch and promptly ate a sandwich. Seriously. In honor of what was to originally take place today, I painted gummy bears on my nails- even the best flavor - clear (pineapple) on the pinky nail, even though it is hard to make out what it is. :-P OVER 3 POUNDS! I feel nauseous just thinking about it. The thing was the size of a baby. No joke. Fish ate a baby.


I used OPI Alpine Snow Matte as a base, which chipped horribly within 2 hours. For the red bear, I used China Glaze Salsa, for the orange bear, Sally Hanson Hard As Nails Xtreme Wear in 06 Sun Kissed, for the yellow bear Urban Outfitters Yellow 1, for the green bear, OPI Green-wich Village, and for the clear bear, I used Maybelline Banana Puddin', which I can't find a link for, but I got mine from a lovely Aussie girl on Makeupalley.com. Everything was mixed with Sally Hansen All the White Stufffor the highlights. For the clear bear, I used Urban Outfitters Yellow 1 to distinguish the shapes on the bear (eyes, belly, etc). Topped everything off with 2 coats of Seche Vite top coat.

The maiden bite. He bit off his face because the bear was supposedly 'looking at him funny'.


After 3 lb. 3 oz was eaten.


And...because I found it amusing... the Spork, which isn't really a spork, but a Star Trek fork.


Eat Long and Prosper.

My teeth hurt.

Thursday, 25 February 2010

Clean up in 6 easy steps

I know there are so many great articles about this already, but I wanted to show you how I do my cleanup anyway. I get so many questions about how I paint my nails, I always end up searching for articles to refer to. I figured it would be nice to have a reference of my own! There isn't much to it really, so I'll try to keep this post short and simple. Well, here goes..

Nail polish clean up
A blog about nail polishSo, you painted your nails in the best way you possibly could and everything went pretty wel. But it still doesn't look perfect. Yet!

You can leave it like this, or if you're a perfectionist freak like me, you'll try to fix this. There are several methods to smoothen out the cuticle line, like using corrector pens or q-tips drowned in nail polish remover.

Experience has taught me that the method I'm about to show you works best for me! It's really simple, quick and you'll only need two products.
A blog about nail polishFirst thing you'll need is a brush. It's really up to you what kind of you brush you'll use, but using a medium, not too stiff brush is something I would recommend. You might have to try different kinds to figure out what works best for you.

Found the perfect brush? You might want to consider getting backups. The brush will show signs of wear and tear after a while, so you'll need to replace it eventually.

The brush I'm using is a paint brush, so it doesn't have to be a fancy make up brush at all!
Nail polish clean up
A blog about nail polishWhat you'll also need is something to remove nail polish with. Pure acetone is hands down the easiest and fastest solution! However, normal nail polish remover will work too.

Recently I switched back to using nail polish remover, since pure acetone can be very drying. It made my hands look super wrinkly.

I wish I was an expert on this topic, but you might want to look up the negative side effects Acetone can have, before you decide to use it.
A blog about nail polishOk, let's do this! Take your brush and dip it in the Acetone. Make sure you don't have too much on your brush by dapping it on a cotton pad first. If there's too much Acetone the polish will flow into the edges of your cuticles and we really don't want that to happen.
Now, place the brush next to the nail polish line you want to neaten. Sweep your brush lightly, without applying any pressure (Geez I feel like Bob Ross now). You'll only have to take away a slither. Dap your brush on your cotton pad every now and then, because the nail polish will build up in it. You can also use your brush to get rid of any nail polish that has landed on your skin.
Nail polish clean up
A blog about nail polishTadaaa: a pretty smooth line near the cuticle. And it wasn't that difficult at all. It usually takes me about 5 minutes to do clean up, but I always try to apply my nail polish as neat as possible. If your application is a bit messy, clean up will take longer.

There are some things to pay attention to though. Some colors just won't allow you to use clean up. I find that blues, reds and vampies are difficult colors as they tend to flood your cuticles, especially if they're jellies!

Also, you don't want to use clean up on wet nails, I normally wait a good ten minutes before I start.
A blog about nail polishWhen everything is done, it's time for some rehydration!

Cuticles really despise Acetone so it's necessary to use a moisturizer on them, every time after they've been exposed to this hazardous stuff.

Until recently I used different kinds of cuticle oils and balms, but I think I may have found my Holy Grail cuticle treatment: Lemony Flutter by Lush. Rubbing this lovely lemon scented butter into your cuticles will really help them remain soft and hydrated.
Nail polish clean up

The nail polish I'm wearing in these photos is Feeling Blue by Models Own.

This was it for today, I hope you find this helpful! Take care and till next time, xo.

I Feel So Desert-ed.


Hey everyone!! Today's nails are an homage to the seemingly endless span of desert that surrounds the lovely city of sin, booze, hookers, and gluttony that I reside in. :-P No, those aren't bats, they're vultures- the Hunter S. Thompson/Fear and Loathing/Steadman nails are to come in the near future I think. :-D


I used Zoya Yummy as a base, with American Apparel Palm Springs for the desert, then mixed with Zoya Dea to shade. For the cacti, I used L.A. Girl Army Green, that I got at Urban Outfitters, Pure Ice Wild Thing to highlight, and Nubar Forest
for shadow. For the vultures, I used Zoya Raven. Topped everything off with Seche Vite top coat so it'd dry superfast, then topped off the sand portion with Essie Matte About You. :)

Note: No bodies are buried in the desert pictured, unlike the desert surrounding Vegas. ;)


I'm scared...

Models Own heeft mijn gedachten gelezen... *zet aluhoedje op*

Models Own read my mind... *puts on tinfoil hat*


Zie je?! Paarse modderkleur! Ze weten het!
Dit is een van de lakjes die ik van IceRozie heb gekregen voor mijn verjaardag. Prachtig! I kon er niet eens overheen konadden. Je moet niet rommelen met perfectie.

See what I mean?! Purple Mud! They know!
This is one of the polishes IceRozie gave me for my birthday. Beautiful! I couldn't even konad over it. You shouldn't mess with perfection.


De naam is Purple Grey and dat klopt precies. Prachtige rijke mooie modderige paars-grijs. Als ik Models Own om haar hand zou vragen zou ik dan met haar mogen trouwen?

The name is Purple Grey and it is just that. Gorgeous lushious beautiful muddy purple grey. If I would ask Models Own for her hand, do you think they will let me marry her?

Wednesday, 24 February 2010

Gosh - Rainbow

Gosh Rainbow

Hi everyone! How is everybody doing? I hope great :-). Unfortunately I don't have a lot of time today so this will be a very short post, sorry about that!

Let's jump straight to the nail polish: Gosh Rainbow has got to be one of the finest nail polishes Gosh created. It's a top coat filled with orange-green duochrome flakies. Imagine all the combinations you can make with this! My favorite combination has to be with black though. I layered it on top of BeYu's #318, a lovely, easy to handle, black creme. I applied 2 coats of black and only one coat of Gosh Rainbow. The finish of Rainbow is really smooth, not bumpy or gritty at all. Don't you just love the way the colors change?

Oh before I forget: I get a lot of questions about how I paint my nails, especially around the cuticle area. Expect a post about this very soon!

I've got to run now, take care and till next time!

I've Gotta Go No. 2.


hahha. Did the title worry you? :-P

I was laying on the couch last night trying to think of what to do on my nails, and totally not wanting to go out to my car to get my idea notebook. Suddenly it dawned on me, based on my nails yesterday, to do pencils!! :)


I used a mix of China Glaze Salsa and American Apparel Palm Springs for the eraser, China Glaze Millennium for the metal band, and then mixed with Zoya Raven for the shadow on the grooves on the band. For the pencil portion, I used Diamond Cosmetics #319 Lemon Yellow Zest for the pencil color, and then mixed with Electric Orange for shading on the sides of the pencil. Topped off the pencil and metal parts with Seche Vite top coat and the eraser with Essie Matte About You to give it that rubery look, but my lotion made it sorta shiny. damn. Oh well, now it looks like one of those old, hard erasers. :-P